In the last post we figured out how to work around the issues with reading .kml and .kmz files into R. Towards the end of the post we encapsulated the logic into a function called read_keyhole. In this post we will build a package around the read_keyhole function.
Building R packages sounds intimidating. But it is easy with the help of the {devtools} and {usethis} packages. I will not be able to go into the detail required to cover every aspect of building a package. Check the R Packages book for a complete overview of the package building process.
Create a new package
It'll probably be best to just get into it. The following lines of code will initialize a new RProject and take care of some of the boilerplate code associated with starting a new package. We will call the package {keyholeio} since the purpose of this package is to read or load keyhole files (.kmz or .kml) files into R.
install.packages('devtools')
library(magrittr)

# create a new package
usethis::create_package('~/Documents/keyholeio')

# initialize git repo
usethis::use_git()

# choose a license
usethis::use_mit_license('Your Name')
The directory structure will look a bit like this:
.
├── DESCRIPTION
├── LICENSE
├── LICENSE.md
├── NAMESPACE
├── R
├── README.md
└── keyholeio.Rproj
Now, to create the read_keyhole function.
usethis::use_r('read_keyhole')
#> ● Edit 'R/read_keyhole.R'
The use_r function creates a new file in, R/read_keyhole.R. The R/ directory is where all the R code for our package will live. The read_keyhole.R file is where we will write the code to read keyhole files.
read_keyhole <- function(file) {
  # ... code to read keyhole, we will add this later
}
And yet again, we can use {devtools} to load the function.
# load packages functions
devtools::load_all()

# and use it
read_keyhole('path/to/files.kml')
Documenting functions
It is always a good idea to document functions as they are written. If using RStudio go to the Code > Insert Roxygen Skeleton (notice the keyboard shortcut). This will insert a {roxygen2} skeleton into the R Script. I'm definitely still working on better understanding the best way to document a function. Below is the simple outline for the read_keyhole function.
#' Read simple features from kml or kmz files
#'
#' @param file a file path to a valid .kml or .kmz file
#'
#' @return an sf object when the layer is successfully read.
#' @export
#'
#' @examples
#' read_keyhole(system.file('extdata', 'routes.kml', package = 'keyholeio'))
When the package is built these templates will be converted to a .Rd file. Which will then be used as the help files that can be browsed on CRAN. Again, check the R Packages book for a better understanding of documentation. Or, better yet, read the documentation of your favorite packages and try to imitate them.
Other Packages
This package is going to rely on the {sf} package to read keyhole files into R. Because we are relying on functions outside of our package we will need to import them for use in our package. We can do this with the usethis::use_package function from the {usethis} package. We are going to use {sf} for it's spatial capabilities and {fs} for working with the file system. Try not to confuse the two, I do all the time.
usethis::use_package('fs')
usethis::use_package('sf')
Data
This package is dealing with importing data from outside R. This is a special circumstance. Many packages work with data already within R, which would be much easier. To ensure a consistent testing environment raw data will be included with the package. This data will live in a directory called inst/extdata/. Create these folders then add the data from this repo.
Adding data like this to a package will also makes documentation and providing examples easier. Read more about data in the Raw Data section of the R Packages book.
Writing tests
A common workflow when writing functions is to:
- Write the functions
- Load them to the global environment
- Manually test with various inputs and make sure the outputs meet expectations
While this is better than nothing, it isn't very efficient. Setting up an automated testing workflow in R is easy. {devtools} and {usethis} provide helper functions to get us started.
usethis::use_testthat()
usethis::use_test('read_keyhole')
This will:
- Create
tests/testthatdirectory - Create
tests/testthat.Rwhich will run all tests we create - the
use_testfunction will create an R file within thetests/testthatdirectory. This file will hold all the tests related to theread_keyholefunction.
Testing methodologies
Many testing methodologies exist, each have benefits and drawbacks. We will focus on using test-driven development (TDD) to build our test suite. The concept of test-driven development follows a well defined sequence.
- Add a test. Each feature begins by writing tests first. These tests are based on the expected outcome of the new feature.
- Run tests and see them fail. The tests will fail because we have yet to write the code.
- Write code that causes the test to pass. This code doesn't need to be perfect. It only needs to cause the test to pass
- Run tests again. If the code is written properly the tests should pass.
- Refactor the code. This includes cleaning, simplifying, or optimizing.
- Repeat for new features.
This style of testing is often refered to as red-green-refactor. Write failing tests (red). Write code to pass tests (green). Refactor. Having written tests, then passing the tests, developers are confident that any changes to the code will be validated against the existing tests. I really like this article, and others written by Eric Elliot, as a resource for TDD. These articles are written for Javascript users but the intent is the same regardless of language.
Before we get to writing tests let's double check the directory structure.
.
├── DESCRIPTION
├── LICENSE
├── LICENSE.md
├── NAMESPACE
├── R
│   └── read_keyhole.R
├── inst
│   └── extdata
│       ├── routes-multi.kml
│       ├── routes-multi.kmz
│       ├── routes.kml
│       └── routes.kmz
├── keyholeio.Rproj
└── tests
    ├── testthat
    │   └── test.read_keyhole.R
    └── testthat.R
Our first test
What should we test first? Let's think about the expectations for the test.read_keyhole function.
- Check that the provided file is a
.kmlor.kmzfile. If it isn't throw an error. - If the file is a
.kml, use{sf}to load it. - If the file is a
.kmz, do the kmz hack to load it. - If the file has multiple layers, iterate over the layers and load all of them.
And now, we implement those expectations in the test code. However, only one at a time. Implementing all of these tests at once might lead to confusion. Imagine writing all these expectations then the tests fail. How will we figure out where the error occured? This is the purpose of red-green-refactor. Write one test first, it will fail. Then write the code to make the test pass. Write the test for the next feature... and on and on.
First, let's test that the program throws an error when an unrecognized file type is provided. Write the follow lines of code in the tests/testthat/test.read_keyhole.R file.
# a test to check that our code throws an error
test_that('throw error with invalid file type', {
expect_error(
keyholeio::read_keyhole('routes.csv'),
'file must be a kml or kmz file'
)
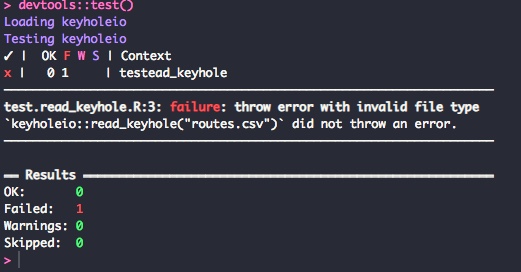
})Now, run the tests with devtools::test(). Remember this test should fail as the code isn't written yet. The result of the test should look something like this image.
And now write the code to make the test pass. Open the R/read_keyhole.R file and add the code below. This will differ a bit from the code we wrote in the previous post.
#' Read simple features from kml or kmz files
#'
#' @param file a file path to a valid .kml or .kmz file
#'
#' @return an sf object when the layer is successfully read.
#' @export
#'
#' @examples
#' read_keyhole(system.file('extdata', 'routes.kml', package = 'keyholeio'))

read_keyhole <- function(file) {
  # get file extension
  ext <- strsplit(basename(file), split = '\\.')[[1]][-1]

  if (ext != 'kml' & ext != 'kmz') {
    stop('file must be a kml or kmz file')
  }
}
Now test with devtools::test(). This time it should pass...
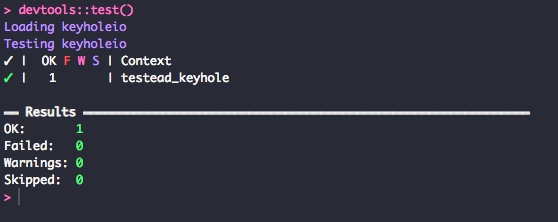
There you go. Passing tests!
Other Tests
I'm going to skip ahead by adding all the tests for this function. In order to get to this point I added one at a time, adding code to the read_keyhole function to pass the tests. Below is the entirety of test.read_keyhole.R.
test_that('throw error with invalid file type', {
  expect_error(
    keyholeio::read_keyhole('routes.csv'),
    'file must be a kml or kmz file'
  )
})

test_that("reads kml files", {
  input_file <- system.file('extdata', 'routes.kml', package = 'keyholeio')
  routes <- keyholeio::read_keyhole(input_file)

  expect_is(routes, 'sf')
  expect_equal(nrow(routes), 4)
  expect_true("geometry" %in% names(routes))
})

test_that('reads multi-layer kml files', {
  input_file <- system.file('extdata', 'routes-multi.kml', package = 'keyholeio')
  routes <- keyholeio::read_keyhole(input_file)

  expect_is(routes, 'sf')
  expect_equal(nrow(routes), 4)
  expect_true("geometry" %in% names(routes))
})

test_that('reads kmz files', {
  input_file <- system.file('extdata', 'routes.kmz', package = 'keyholeio')
  routes <- keyholeio::read_keyhole(input_file)

  expect_is(routes, 'sf')
  expect_equal(nrow(routes), 4)
  expect_true("geometry" %in% names(routes))
})

test_that('reads multi-layer kmz files', {
  input_file <- system.file('extdata', 'routes-multi.kmz', package = 'keyholeio')
  routes <- keyholeio::read_keyhole(input_file)

  expect_is(routes, 'sf')
  expect_equal(nrow(routes), 4)
  expect_true("geometry" %in% names(routes))
})
A nice thing about this style of testing is that the tests are self-documenting. Each test is nearly a complete sentence. Look at the second test: Test that read_keyhole reads kml files. Expect that routes is an sf object, expect routes to have 4 rows, expect geometry to be in the column names. The tests translate into a sentence, for the most part.
Granted, it does help to be familiar with the {testthat} package. The functions that start with expect_ are called expectations. There are many of them but they are fairly easy to learn. The expectations work as expected. expect_lt compares the values and checks that the first value is less than the second.
Now, rerun the tests. Most should fail. Actually, so many tests will fail that you'll see this error message: Terminating early: Too many failures. That is a painful message!
Let's write the rest of thte read_keyhole function.
read_keyhole <- function(file) {
  # get file extension
  ext <- strsplit(basename(file), split = '\\.')[[1]][-1]

  # if kml
  if (ext == 'kml') {
    layers <- sf::st_layers(file)$name

    if (length(layers) > 1) {
      return(Reduce('rbind', lapply(layers, sf::read_sf, dsn = file)))
    }

    return(sf::read_sf(file))
  } else if (ext == 'kmz') {
    target_file <- '.temp.kml.zip'

    fs::file_copy(file, target_file, overwrite = T)
    unzip(target_file, overwrite = T)

    sf_out <- sf::read_sf('doc.kml')

    fs::file_delete(target_file)
    fs::file_delete('doc.kml')

    return(sf_out)
  } else {
    stop('file must be a kml or kmz file')
  }
}
At this point every test passes except for one. This is because we haven't written the code to handle multi-layer kmz files.
Refactor
Again, let's jump the gun a little bit and begin refactoring. Normally this step happens once all the tests pass. The read_keyhole function still doesn't handle reading multi-layer kmz functions. We'll fix this while refactoring.
A short list of things I think need to be fixed with read_keyhole
- The error is thrown at the end
- Nested if statements, and if else
-
Doesn't handle multi-layer
kmz- if it did handle multi-layer
kmzsome code will be repeated
- if it did handle multi-layer
- This function does more than one thing
- Readability?
As we go about fixing these in the code we can run the tests to see that our code is still working properly. That's one of the biggest benefits of writing tests first. No more manually testing code to see if your changes are working properly. Every time a change is made, run the tests, see what passes and what doesn't, then make the required changes. And, because our tests are built for every expectation we don't need to manually test the different cases.
Let's rebuild this function, step by step, until all our tests pass.
Check the file type
The first thing we will work on is checking the file type and thowing the error earlier in the function. This might be a personal choice, but I prefer seeing as much error handling early in the function as possible. Especially something that checks the inputs.
read_keyhole <- function (file) {
  # parse filename
  filename <- strsplit(basename(file), split = '\\.')

  # initiate conditions
  is_kml <- filename[[1]][-1] == 'kml'
  is_kmz <- filename[[1]][-1] == 'kmz'

  # check that input is kml or kmz, throw error otherwise
  if(!(any(is_kml, is_kmz))) stop('file must be a kml or kmz file')
}
The changes here are mostly increasing the readability and moving the error handling higher closer to the beginning of the function.
I am stealing the is_kml and is_kmz variables from the Javascript the world. Instead of using an expression in the if statement, we are saving the result of the expression as a variable. I really like if statements to read like a sentence. if(is_kml) makes sense when you read it. if(filename[[1]][-1] == 'kml') takes a second or two to comprehend. Again, this is the way I like to do it. Like most things in R, there isn't a correct way. What matters is that the result is correct.
Run the tests, yes most tests will fail. However, notice that the error is still being thrown. As expected.
Handle the kml
Let's think about the kmz hack we built into our function. This step is where we could have duplicate code.
- Zip the
kmz - Extract the
kml - Read the kml
Eventually reading a kmz becomes reading kml. Instead of rewriting the code to read a kml twice let's encapsulate this into it's own function called handle_kml. Create a new file R/handle_kml.R. Then add the following code to that file.
handle_kml <- function (kml) {
  layers <- sf::st_layers(kml)$name

  if (length(layers) > 1) {
    return(Reduce('rbind', lapply(layers, sf::read_sf, dsn = kml)))
  }

  return(sf::read_sf(dsn = kml))
}
This bit of code is pretty much copied and pasted from the original function. We've only encapsulated it into a second function. Now use this function within the read_keyhole function.
read_keyhole <- function (file) {
  # parse filename
  filename <- strsplit(basename(file), split = '\\.')

  # initiate conditions
  is_kml <- filename[[1]][-1] == 'kml'
  is_kmz <- filename[[1]][-1] == 'kmz'

  # check that input is kml or kmz, throw error otherwise
  if(!(any(is_kml, is_kmz))) stop('file must be a kml or kmz file')

  if (is_kml) {
    return(handle_kml(file))
  }
}
Maybe it is just me, but this is very readable. It's almost a sentance. If is kml handle kml file. Run the tests, except for the kmz tests, everything passes.
Handle the kmz
Now we need to encapsulate the kmz hack into a function. There will be a few small changes from the previous post to better handle the creation of temporary files. Add the following code to a new file called R/handle_kmz.R.
handle_kmz <- function (kmz) {
  # temporary files
  target_file <- normalizePath(paste0(tempdir(), '/', 'temp.zip'))
  temp_kml_file <- normalizePath(paste0(tempdir(), '/', 'doc.kml'))

  # copy, zip, unzip kmz hack write to tempdir()
  # temp dir is cleaned automatically after the R session ends
  fs::file_copy(kmz, target_file, overwrite = T)
  utils::unzip(target_file, files = 'doc.kml', exdir = tempdir(), overwrite = T)

  # generate output
  sf_out <- handle_kml(temp_kml_file)

  return(sf_out)
}
Everytime an R session starts a temporary directory is created. The tempdir function will grab points to that temporary directory. normalizePath creates a consistent file path across operating systems. Like we said earlier, at the end reading a kmz is the same as reading a kml. So we end up using the handle_kml function we created earlier.
Use this function within the read_keyhole function.
read_keyhole <- function (file) {
  # parse filename
  filename <- strsplit(basename(file), split = '\\.')

  # initiate conditions
  is_kml <- filename[[1]][-1] == 'kml'
  is_kmz <- filename[[1]][-1] == 'kmz'

  # check that input is kml or kmz, throw error otherwise
  if(!(any(is_kml, is_kmz))) stop('file must be a kml or kmz file')

  if (is_kml) {
    return(handle_kml(file))
  }

  if (is_kmz) {
    return(handle_kmz(file))
  }
}
Load the package
We are done developing! The last few steps are to load the package, that way it is available just like any other package we may use.
# extract roxygen comments for documentation
devtools::document()

# check that it can be installed, a dry run
devtools::check()

# install!
devtools::install()
Wrap up
And there you have it. Your own R package. This package is available on GitHub if you want to check that out.
With the basic of building blocks of an R package out of the way you can make your own. There are so many functions that I use over and over again in my workflows. Often I'll just copy the scripts to which ever directory I am working in. That's how this package started. Eventually I decided to write it as package because I was tired of copying the scripts. Now I can just install it from GitHub whenever or wherever I need it.